Tuesday, April 26, 2016

Hiking Shenandoah National Park: AT at Lewis Mountain and South River Falls

Hey Everyone! This past Friday was Earth Day and each year I try to do my best to reduce my negative impact on our planet by either making green cleaners, planting a garden or just something simple as keeping all the lights off. This year I decided to go out and be a part of it. It was a great weekend to go out for a hike and I took the opportunity do just that!

I went up to Shenandoah NPS to hike South River Falls. The weather, honestly, could have been better, but I was happy to be able to go out and hike considering the fire that is currently engulfing a large section of the park. It has closed off many hiking spots along Skyline Drive, however they are doing the best they can to contain the fire as best as possible.
Friday night I drove up to Lewis Mountain to camp overnight. This is a great place to launch from for most hikes between the Swift Run Gap and Thornton Gap Entrances. Note, This campground is first come, first serve and each site can only be held for the day. So, if you plan on camping a few days in a row, you must re-reserve each day. It is $15 per site, per day.  It does have running water as well as a bathroom (with showers). They have fire pits and benches for weekender stays. I did see some RV's camping out but mostly tent campers were spotted. Also, if you have recycling, they are a great place to drop-off. We were happy to find a nice spot, however, most neighbors did not respect the 10p quiet time so it made it quite difficult to go to sleep early. If you have the ability to, reserve the Pocoson Cabin (primitive camping on the South River Falls trail- bring water as there will be none available). 

I was happy to finally test out my new REI tent and she worked wonders. Easy to put together and assembly took about 5 minutes. Very impressive. Personally, she is more of a 2 season tent and lends well to rain, which we did have that evening. Dis-assembly was just as quick - considering we did as 630AM. I recommend once you get home, reassemble to dry and wipe down and then pack away. The tent is on sale now with REI, so if you are looking for a great tent, this is one to pick. She sleeps two comfortably and it has a room for a child/dog as well as gear. And, she fit well into my Osprey Aura pack.
We departed from Lewis Mountain at 640AM, and drove the 2 miles down to the South River Picnic Area and parked. They have restrooms and trash cans as well here, so this is a great pit stop along Skyline as well just for a day trip out for lunch. We grabbed our breakfast from our packs, stuffed our bellies and headed out with day packs and water. We did the South River Falls loop, totaling about 4.8 miles (we followed the loop to the falls, hit the Fire Road and grabbed the AT for the remainder of the trip back to the first 0.03 miles of the beginning of the loop where we started. 
The entire trek was not bad. Considering we left so early, there was only another car at the parking lot when we arrived, and honestly, when we left at 1030AM, the parking lot had about 10 cars, so the earlier the better for this trail. We did not see many people on the actual South River Loop, most hikers we encountered were trekking along the AT. There were two parties of trail runners, but pretty isolated otherwise. Wildlife consisted of a party of female deer grazing on the nearby foliage at the first part of the loop (prior to the AT crossing). A few birds were seen and we did find a family of chipmunks along the lower part of the loop. Thankfully, no snakes or bears were spotted, like many had previously warned. It was about 66 degrees, so that may have been a factor.
I will say this small section of the AT is a great trail - not too many roots or difficult terrain. Also, this is a great section of the trail to trail run, as so many people had done that morning. It was a relatively easy section and would be a great opportunity to get acclimated to the trail. My suggestion is start at Swift Run Gap Entrance, park and hike up to the South River Trail and end at Pocoson Cabin and do the loop back. There are many options but this particular section of the trail provides a great chance to hop on for a challenging day hike as well. 
Overall, the hike was really great. I liked the ability to change scenery by going down the fire road (although nothing to look at), and the option of doing the full larger loop for 10.4 total miles. Unlike some of my past hikes, this one did not have many overlooks or places to really see well. It is fairly bland compared to the other hikes, so if you want a lot of vistas and outcroppings, this is not really one of those hikes. However, the falls are fantastic, and during the summer provide a great relief to the heat. So, this is a great hike for the summer - with the falls as a great spot to stop for swimming. 

Monday, April 25, 2016

FitBit Healthy Habits Challenge!

Since I purchased my new FitBit ChargeHR (I had the FitBit Flex gifted to me previously), I have been diligent about keeping myself a lot more active. Every day is a new opportunity to do better than the day before. While a personal fitness device can be expensive (and a personal choice), in my opinion, it can have a lot of benefits you can use to help you meet your own personal fitness goals. One of my big New Year's Resolutions this year was to be more active than I was in 2015. And, with my fitness device, I feel I can achieve that goal. While you may not choose FitBit, any fitness device that can help you achieve your goals is one worth investing in. Invest in your health.
My FitBit ChargeHR
One thing I personally like about FitBit is some of their initiatives on social media and as an avid follower of them on Instagram and Twitter, I found out about their new Healthy Habits Challenge and I figured "why not"! Each week is a new "theme" focusing on an area of health improvement. Now, while we all have different ways of achieving our goals, each one of us can always do more. And, this challenge is a step in the right direction.
Week 1 - Stress
Day 1: Meditate for 10 minutes. (Monday). This one did not take too much planning honestly. I pulled out my yoga mat, set my phone to airplane mode and put a timer on for 10 minutes. To meditate, go to a room where there is no distractions (I put on Awakening by Venedel). I chose my bedroom as it is the most serene and less "stressful" of all the rooms in my home. In order to meditate, sit comfortably in comfortable clothing, minding your posture, clearing your mind of thoughts, and concentrate on breathing. If your mind goes to wandering to a thought, go back to concentrating on your breathing once again. Repeat as necessary. Side Note: I have to admit I felt really calm and at peace afterwards, especially considering I did this right after work. It is a great way to transition home and allows you to calm your mind and not "bring the stress home".
Day 2: Go for a 15 minute walk outside. (Tuesday). Since I had a cold, I really didn't want to go outside. However, after the walk, I felt so much better. A few minutes of sunshine a day can give you a lot of Vitamin D you need. And, when you go outside, you allow your mind to be free of whatever is in your home or office that brings you stress.
Day 3: Drink a Decaf cup of Tea. (Wednesday). I love tea already- and drink it almost every day so this is a bonus for me. I am a fan of Clipper's green tea and bring a few bags in my purse for trips when I want something other than plain water. I also love their white tea version and peppermint in the winter when I get congested. They have a great line of fair-trade and organic blends. 
Day 4: Listen to music that makes you happy. (Thursday). I find the most relaxing of all music I listen to is my Relxation station on Pandora. However, I usually enjoy listening to soulful blues-style music like Chris Stapleton so for the most part, I switched from my most frequented stations to relxation and jazz. Side Note: I could tell you my mood normally varies while I am working but once I put on actual music (not songs with lyrics), i felt more engaged in my work and it felt smoother. The workday flies if you can listen to music. 
Day 5: Do an "Equal Breathing" Exercise. (Friday). Also known as Sama Vritti, this technique is counting between the time you exhale and inhale. There is a great video explaining it if you would like to learn more about it. While I enjoyed this opportunity to try something new, I personally did not feel that it impacted me as much as morning yoga or meditation. Side Note: I really like the series "conscious relaxation by Rodney Yee. I discovered him in college during one of my required Health courses and fell in love with this routine. It helped me during a lot of stressful times in college and I recommend it to my friends who need time for de-stress. If you are not feeling the 'equal breathing", give his series a try. 
Day 6: Write about your day in a Journal. (Saturday). Normally, I do not tend to journal in an actual book - I have had the unfortunate experience of having my personal thoughts read in the past so I have a personal private blog where I take the time to jot things down at and that is where I put my ideas down. This go round, I wrote about my experiences with my health and my day and just anything that was on my mind at the time. I have always been a person to journal and I find that once I get my thoughts down and on paper, a slight feel of relief to what was on my mind. So, take time to mentally disconnect with the world and reconnect with yourself. I highly recommend this on a daily basis, even if it is for just a few moments. 
Day 7: Take time to socialize. (Sunday). This is simply a no-brainer for me. I feel we need to develop and nourish friendships. We are social beings are even if you have a discomfort with a great deal of social experiences, you can find friendship a great place to find connection and comfort. Whether it be a close friend, family or a group of people with shared common interests, take time to catch up with an old friend, talk about a new book or film that inspired you or just make time for family. It is important to have human interaction- studies have proven we as humans are social beings and need social interaction to survive. Even if you do not know anyone (maybe you have moved to a new city?), donating your time and volunteering has the same effect as well.  
Week 2- Nutrition
Day 1: Add an extra veggie to your plate. (Monday). This is a no-brainer for me. And, I usually do it anyway. I made steak and veggies for dinner. Instead of just having asparagus and green beans, I opted to add a helping of sweet potato as well. It was a truly satisfying dish. 
Day 2: Stock up on healthy snacks. (Tuesday). I love LaraBars. They are super healthy to eat and go for on-the-go boost of energy. Since I will be hiking over the weekend I wanted a few for the trip. I also grabbed a huge container of salt-free trail mix (a favorite of mine!). Additionally, I stocked up on green apples and bananas (since I love both with almond butter). 
Day 3: Drink a glass of water before each meal. (Wednesday). This one is honestly tough for me. I have a difficult time getting my normal 8 glasses of water a day in. I did not do so well at the 2 Nalgene Water Bottle a day challenge. However, I made it through and found that drinking water prior to a meal better allowed my system to digest the meal. You can learn more about water's impact on your body here.
Day 4:  Put your meals on a small plate. (Thursday). This is a practice I have been doing for years. I learned awhile ago that we eat visually as much as we do by taste. Eating is an experience. After reading this study by Cornell University, I have changed to using smaller (appetizer sized) plates instead. Even when dining out, I opt for smaller plate portions instead of larger ones.
Day 5: Keep half of your plate green. (Friday). This one was not too difficult during the workday but by evening I was bound for a girls weekend away for my best girl pal Becky (who I inspired to do Whole30- you can read more about that here). Dinner was a struggle but I kept to my goal and still accomplished it - since we had planned salad with our dinner, I loaded up on salad mix with oil and vinegar dressing.
Day 6: Replace candy or sugary snacks with fresh fruit. (Saturday). This one was not too difficult to do on Saturday since I had planned a good hike with the girls, no one craved a candy bar on or after our hikes. I picked apples and stone fruits that kept the girls nourished and we all knew we could easily carry fruit in our packs over candy anyway!
Day 7: Take note of portion sizes. (Sunday). This is something I am conscious of daily so this part of the challenge was not difficult honestly. I kept to keeping my portions sizes correct. If you struggle with portion sizes, this link is a great visual of what our sizes should be. This article helped me a lot during Whole30.
Week 3 - Sleep
Day 1: Try to wake up at the same time every day without pressing snooze. (Monday). I do not normally press the snooze button and catch more sleep. Normally, I will hit snooze on accident when trying to turn it off. As my phone has become my alarm clock, it has basically changed my snooze button habits. The weekends will make this a tad tricky.
Day 2: Go to bed 15 minutes earlier than usual. (Tuesday). I found this to be a lot more difficult as I do not have a set bedtime. I know I should sleep by midnight or so. However, I am by trade a night-owl and often times have difficulty falling asleep without this challenge. I did manage to go to bed earlier than normal, however, I did not fall asleep 15 minutes earlier. Le sigh!
Day 3: Avoid caffeine after 2 pm. (Wednesday). The only caffeine I consume is in my tea normally. As I do not drink sodas and I do not drink coffee that often, this day is the easiest of this week.
Day 4: Make your room sleep friendly by lowering the temps before bed. (Thursday). I actually read this study on sleeping with lower room temperatures and I have noticed better sleep with a slightly chillier room. For this particular night, I lowered the temperature to 65 degrees and I slept wonderfully.
Day 5:  Do some yoga moves before bed. (Friday). I followed this guide from Women's Health on Bedtime Yoga. I had never done bedtime yoga prior to this but I really enjoyed it. I felt a lot more relaxed and ready for bed. This may be the start of doing this on a more regular basis. 
Day 6:  Abstain from alcohol. (Saturday). This one was really difficult - only because I attended a food and wine paring dinner party with one of my very good friends. Having friends who enjoy hosting a monthly dinner party that pairs wine with each dish can make it a bit difficult to enjoy part of the meal when you have to abstain from one part of the meal. However, I made do and I succeeded- even though I did not like it. 
Day 7: Skip all screen time 1 hour before bedtime. (Sunday). This is the hardest for this particular week, considering I normally do a bit of scroll time before bed. And, honestly, I almost forgot this particular day's goal until the evening. But, I did it! (I didn't say I had to like it). I did not notice any difference in no phone versus a night of scroll time before bed affecting my ability to fall asleep or sleep soundly. So, take it as you will.
Week 4 - Fitness
Day 1: Add 1,000 steps to your daily goal. (Monday). My goal is currently 10k steps/day since that is the Surgeon General's recommended daily goal for everyone. Some days I do more, some days I do less, depending on if I am working, running errands, or traveling. (I at least make it my goal for 10 stair climbs a day- as that is a great way to get in shape) During the work week I struggle making the 10K, so this was a true challenge for me from the get go to add an additional 1,000 steps to that goal. Thankfully, I was dog sitting this week, and in having to walk the dog multiple times throughout the day really helped. While you do not need a dog to complete this goal, it has been noted in many studies that having a companion often helps. No pet? Try a close friend or significant other and take a stroll after work and during your lunch break. Side Note: I started this trick where I park further away from the stores I need to run errands in, which makes me walk further. Every step counts, so keep going!!
Day 2: Work out for 10 minutes. (Tuesday). Since I am in the middle of switching gyms, I opted for using my home gym. I did a mix of yoga, light weights and "briskly" walked the dog I am dog-sitting this week. It was a good workout and 10 minutes is really all you need.
Day 3:  Walk/Run 2 miles. (Wednesday). This was super easy to do since I was able to put this in throughout the day. I did a quick walk around the block before work. During lunch, I walked the dog the entire time (I came back to make lunch to eat while I worked). And, in the evening I walked for about 2 hours around the neighborhood. I am thankful for my neighborhood is as beautiful as it is, it makes it easy to see something new.
Day 4:  Do 50 crunches in the morning. (Thursday). I loathe crunches, so I opted to do mine on the stability ball and that helps a ton for me and my back. Try it! 
Day 5:  Work out for 30 minutes. (Friday). This was easy since we left to go hiking for the weekend up in Shenandoah National Park. If you have the opportunity to hit a park, it is by far the best workout you can do! Guaranteed! We ended up camping up there overnight since we wanted to do a hike the next morning! 
Day 6: Stretch at your desk. (Saturday). I was not at my desk, rather on top of a waterfall (more on that soon!) but i did a ton of stretches along the path. It does help with keeping you feeling less stiff throughout the walk. After a 5 mile hike, it is essential!
Day 7: Go for a walk on your lunch break. (Sunday). Since I don't work Sunday, I took the opportunity to walk to the museum to check out a new exhibit. It was the best walk I have had. Culture and fitness - sign me up!

WRAP UP! If you are up for the challenge, I highly recommend it. I found this to really reach a lot of different areas of one's own fitness - both mentally and physically. I feel a lot better after a month. 

Monday, April 18, 2016

Recipe: Homemade Citrus Salad

One of my good friends Mike hosted a dinner party at his new cabin on the river and invited his two friends who are chefs by hobby to come cook for us all! And, it was a complete blast! I am going to share with you my favorite course of the entire menu - which I duplicated for lunch this week. And, the best part is that it is not only super easy to make, it does not take a long time to create! It is really phenomenal! If you follow me on Instagram, you have seen a sneak peek of this salad! And, this can be made ahead of time!
Ingredients:
  • 1 Grapefruit
  • 2 Blood Oranges
  • 2 Cara Cara Oranges (Naval works just as well)
  • 1 Purple Onion
  • 6 Mint Leaves
  • 1/2 Tbsp Dijon Mustard
  • 1 Tbsp EVOO
  • 1/4 C Feta Cheese Crumbles (Goat Cheese works just as well)
Instructions:
  1. In a large bowl, place a deep strainer on top (this will hold the fruit and allow the juices to drip into the bowl (the juice will be used in the dressing later- so save as much as possible). 
  2. Take the fruit and remove all peelings. Set peelings aside. Slice fruit (until each piece looks like a star in the center) and place into strainer. Take peelings from fruit and squeeze any remaining juice into the bowl with the rest of the fruit. 
  3. Julienne 1/2C of purple onion and set into juice mixture in large bowl. This will allow the onion to slightly "pickle", which will reduce the strong taste of the onion. 
  4. Place fruit in strainer on serving plate or platter. Refrigerate until ready to serve.
  5. Dressing/Vinaigrette: Using the juice from the sliced citrus fruit (it should just have purple onions in it at this time), add to it the Olive Oil and Dijon mustard. Whisk until well mixed. Add a pinch of salt and pepper and adjust to taste. Refrigerate until ready to serve.
  6. Before serving, finely slice mint leaves. Top fruit platter with dressing and sprinkle onions, cheese and mint on top. 
This will make 2-3 servings - however, you can double the fruit, onion and dressing mixture as needed for additional people. This recipe is a "palette cleanser" so if you are serving for dinner- make it your first course! Saves well and can be divided up for lunch easily. Enjoy!

Thursday, April 14, 2016

Recipe: The Best Pot Roast I Ever Made

I admit it. I made the best Pot Roast ever! Honestly, I do not believe it had as much to do with me as the amazing meat I picked up at my local farmer's market. Seriously, support those guys and gals! They work hard and by supporting local businesses, you are supporting your area! It just makes sense.
My beef for this pot roast came from a local farm called PolyFace Farms- I am sure by now most of you are aware of the owner/farmer Joel Salatin (he is from the documentaries Farmageddon as well as Food Inc.) and his farm is 100% organic and humane in raising, cows, chickens and pigs. His farm provides such amazingly tasteful meat. If you have the opportunity to get any meat from his farm, do so!
Okay. Onto the pot roast. Now that you have the best possible meat (I choose chuck roast), you need a few other root vegetables and herbs to get you started. This can be made in the dutch oven easily the same way (total cooking time 4 hours) - however, I made mine in the crock pot since I was leaving for the office!
Ingredients: 
3 C Beef Stock
1 3-5lb Chuck Roast
1 Onion - cut and halved
4 Whole Carrots - cut into 2 inch pieces
4 Stalks Celery- cut into 2 inch pieces
1 C Red Wine (I used Arrowhead Pinot Noir)
3 Medium Potatoes - cut and halved
1 Tbsp Butter
1 Tbsp Dried Shallot
1 Tbsp Fine Herbs
1 Tbsp Garlic
1 Tbsp Sweet Paprika

Rub Roast with salt and pepper. Add all ingredients to crock pot (except onion, carrots, potatoes and celery) and set on High for 2 hours. Reduce to low for 2 hours. Add in onions, carrots, potatoes and celery and continue cooking on low for 3-4 hours, or until meat pulls apart with fork.

Serve & Enjoy!


Tuesday, April 12, 2016

Product Review: Micellar Water

Hey everyone! I am back with another product review and this time it is about a new type of cleanser that has landed on the beauty market and taken off in full force. Micellar Water.

So, first off, Micellar Water is tiny oil molecules (called "micelles") that are suspended in soft water that is attracted to dirt and oil. Once it comes in contact with the skin, it draws out those impurities without drying out the skin. It is a cleanser that is somewhere in between a toner and cleanser.

Lazy girls, this is the product for you- it is a one stop shop type of product. You simply pour a small amount of a cotton pad and wipe across the skin (similar to a toner). It is that easy. As this is a gentle cleansing option, a lot of friends of mine who have oily skin have suggested it does not give them as clean feeling as other product combinations, so if you have oily skin, you may not like Micellar Water. Also, Micellar Water is not designed to take off makeup- as most cleansing oils are used for. So, for stubborn makeup, I recommend either Neutrogena (for budget-conscious ladies) or the Caudalie (my absolute favorite cleansing oil) for makeup removing options.

I tried Good Things Acai Berry Multi-Tasking Micellar Water and I am hooked. Not only is their product line cruelty-free it is also free of parabens, sulfates and the like, all their products are just amazing. The smell of the Micellar water is just wonderful. I love the subtle berry scent and the water simply leaves my skin radiant and glowy. I have not had any issue with dryness and I have been using it daily for the past two weeks. I am a huge fan!! I was a bit hesitant to try a Micellar water since I love my cleansing oil, but I am happy that this product packs a mean punch. I tend to stay away from products that will strip your skin of its natural oils (making the issue twice as bad), but Micellar water has not be an issue for me. One thing I love about Micellar water is it is a two-in-one product and makes a perfect addition to your travel beauty routine.

Monday, April 11, 2016

Product Review: Vitamin Packs

Hey Ya'll! So for the past month I have been using the Finest Nutrition Women's Daily Pack multi-vitamin packs and I wanted to give my review on them for anyone interested in starting a vitamin regime and are considering using multi-packs. First, I am not a doctor or certified in any way to give medical opinions. All of the opinions are my own and based on my experience. Before starting a vitamin regime, you should go see your doctor and discuss your medical history to see if it is right for you.
Now, I was really excited to try these since they are gluten-free and did not have any sugars noted in the ingredient list that would cause me any allergic reactions. I had spoken with my doctor about increasing my iron intake and I felt that a mulit-vitamin would be useful. My doctor suggested that if I was not getting enough vitamins through food, to try it out and see how I felt. Instead of option for just an iron supplement, I opted for a multi-vitamin pack instead.

This pack includes 5 vitamins/mineral tablets in a 30 day supply:

  • Multi-vitamin
  • 1,000mg fish oil
  • 1,800 IU Vitamin D3
  • 1,100 mg Calcium
  • 400 mg Cranberry

I was excited about the benefits in a pack. As opposed to buying 5 bottles of each (roughly about $6-10/bottle), I spent $15 for the packs ($0.47/each pack). So, it was a good deal already.  Additionally, I took mine every morning with breakfast and a large glass of water. (Note: I had to eat a banana after just to make sure it settled in my stomach- otherwise it made me ill). I really like this pack and the supplements are small and easy to swallow, compared to other brands of multi-vitamins.

After the first day or so, I really didn't feel a difference or after the first week. However, after the 30 full days, I can tell you my overall mood has improved in general and my skin looks a lot healthier. I have not had issues with my low iron and I can tell that my immune system seems to be a lot stronger than before (I have not had too many issues with this anyway), but I have been around a lot of people who were sick and I have not caught their colds. My hair seems smoother and less prone to split-ends and my nails feel a lot stronger when I attempted to grow them out (typically they are very thin and prone to split easily).

The only downside to buying the packs over the individual pill bottles and dividing up the daily portions yourself is that with the packs you may have a pill missing out of a pack. Out of the 30 packs, only 3 packs were missing the cranberry supplement. Which by the odds, is pretty good. However, if you are looking at the overall idea of the packs, you did pay for those missing supplements.

Overall, I was impressed with the options and I felt the only real supplement missing from this pack is the Biotin supplement I feel women use a great deal of for strengthening hair, skin and nails. And while this pack is missing those, a bottle of Biotin will run you about $6-$8. That supplement can be easily included with this pack for a full range of needs a majority of women need. I do love the green tea extract and fish oil (both of which have been noted in studies as having properties to aid in the prevention of sunburn). So I really love this supplement pack for the summer. The ease of grabbing your vitamins and go is a bonus and the box can easily be stored in the fridge to maintain freshness (if you feel you will not take them daily, though I suggest taking the 30 packs in sequential order).

Thursday, April 7, 2016

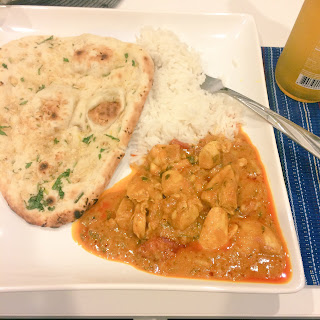
Recipe: Homemade Indian Inspired Butter Chicken

I am a foodie at heart. I mean I love food with soul, a dish that tells a story. And, I think each one has its own unique tale. Each spice represents a character of the story and with each addition of an ingredient, the plot thickens. When a dish has a soul, it just seems to transport you to another place. And, for me, that is always a dish made at home.

We had gone out a few weeks ago to a new Indian restaurant and I just fell in love all over again with Indian fare. I love the spices, the simple ingredients, and just the overall view on using spices to make a simple ingredient become BOLD by a different blend of spices! It is exciting to go out of your comfort zone and try new things. I had a sensation dish of Butter Chicken. And, I wanted to recreate it at home- and I did! So, this is my story for you of the time I rediscovered an old favorite dish.

Butter Chicken (Serves 2-4)
  • 1 package of Chicken Breast Tenders, cut into cubes
  • 1/2 C purple onion, chopped
  • 1/4 C Cilantro, chopped finely
  • 3 Garlic Cloves, chopped 
  • 1 1/2 Tbsp Tomato Paste
  • 1 C Diced Tomatoes (canned is fine if you are pinched on time)
  • 1/3 C Plain Yogurt
  • 1/2 C Heavy Cream
  • 1/2 Tbsp Butter
  • 1 Tsp Cumin
  • 1 Tbsp Turmeric
  • 1 Tsp Paprika
  • 1 Tbsp Ginger
  • 1 Tsp Garam Masala (you can make your own and store it)
  • 1 Tsp Pepper
  • 1 Tsp Salt
  • 1 Tbsp Honey
  • 1/4 C Almonds (optional)
Combine all ingredients (except diced tomatoes and almonds) into bowl and stir well to combine all ingredients. Coat chicken well and set in refrigerator for 2-3 hours (no more than 5 hours). 

Remove from refrigerator and place in skillet and heat to medium (light boil) for about 10 minutes. Add in diced tomatoes. Reduce heat and simmer for additional 10 minutes.

Serve with a side of Basmati Rice and garnish with sliced almonds with a side of garlic naan. Enjoy!

Wednesday, April 6, 2016

Recipe: Sausage Pasta

I enjoy cooking but sometimes I am limited by what I can eat. And, I don't always have time to make an elaborate meal. I have taken a tip from the french and starting using simplified meals that pack a bold punch. Let the ingredients do the talking and they will speak volumes. And, with this dish, they are shouting! While this particular recipe is for one (I made it for lunch), it can be doubled and tripled for multiple people and multiple meals. It is super easy to make and hardly costs a thing.

Sausage Pasta (one serving)

1/2 C Whole Foods Organic Orecchiette Rigate Pasta
1 Link of Trader Joe's Spinach Fontina & Garlic Chicken Sausage
1 Tbsp Trader Joe's Organic EVOO
1/4 C Avocado Oil
1/2 Tsp Pesto
1 Sun Dried Tomato (sliced thinly)
1 Tsp Oregano
1 Garlic clove- minced
1 Tsp Fine Herbs

Cook pasta per directions on box. Drain and set aside.

Slice Sauce and add to saucepan and cook until lightly browned. Add Avocado oil, EVOO, Pesto and Garlic to saucepan with sausage. Once combined, add Sun Dried Tomato, Oregano, and Fine Herbs and stir well. Fold in pasta and completely cover with oil mixture. Continue to stir and combine for about 5 additional minutes, until pasta is completely covered. Top with grated Parmesan cheese & Enjoy!

Friday, April 1, 2016

Desk Decor

One of the first things I did once I moved was to get my home office setup. It was the most important room, only second to the bedroom, I knew I had to get in order. I chose to not take a full week off this go round so I knew I had to get it all ready for returning back to work. I always find if I make a "happy" work space, I will be more inclined to be more productive and just feel better in my new space. So, without further ado, here is my mini desk space. (If you follow me on IG, you have already seen my post on it!)